今回は、キーの仕様を決定し、キーを追加します。キーの追加には Input Manager か Input System を使用します。Input Manager は従来からあるキー管理の方式、Input Systemは最近追加された方式です。今後は Input System に一本化されるようです。
今回は Input Manager で実装後に、Input System に移植しました。
(今回、かなり長文になりました。Input Systemは明らかに初心者泣かせだと思うので、今後もっと簡単に設定できるようになることを期待します・・・)
- キー仕様
- 従来のキー管理 (Input Manager)
- 新しいキー管理 (Input System)
- Input Manager からの移植(C#スクリプトの修正)
- Input System でのキーの追加
- 次回やること
キー仕様
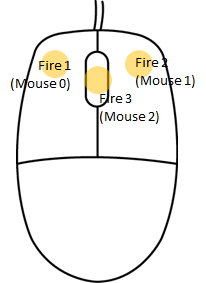
今回はステータスとコマンド表示を実装するため、2つのキーを追加します。
- メニューを追加するために、 "Submit" と "Cancel" を追加します。
- E に "Submit" を、Q に "Cancel" を 割り当てます。
従来のキー管理 (Input Manager)
Input Manager はプロジェクトで1つ存在していて、オブジェクトを生成するなど特別な作業は不要です。初期設定は不要で、初期状態でのキー配置は以下になっています。

キーの追加
"E"キーを Submit に割り当てるには、以下のようにします。
(1) Unity画面メニューから、Edit > Project Settings... を選択
(Project Settings 画面が表示される)
(2) Input Manager を選択
(3) Axis を選択して展開します
(4) Submit で右クリック > Duplicate Array Element を選択
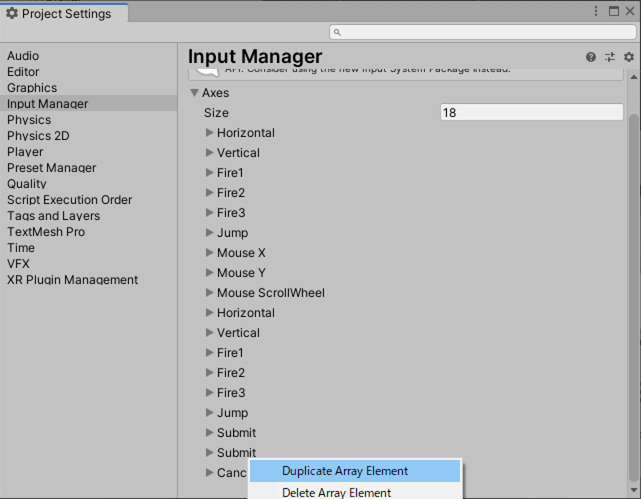
(Submit イベントがコピーされる)
(5) Positive Button を "e" に変更(小文字)
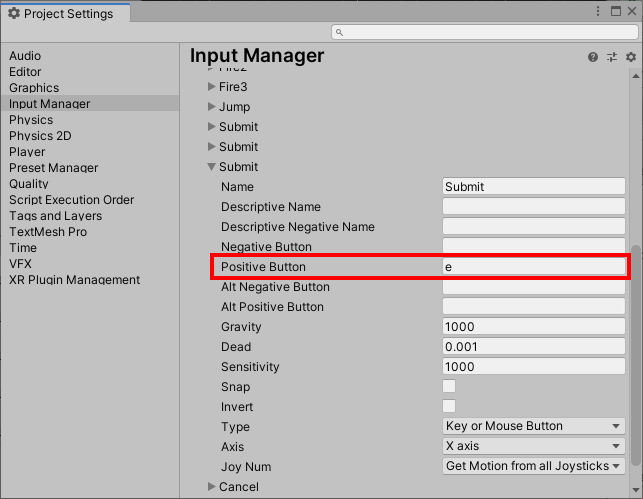
Q を Cansel に割り当てる場合は、上記と同じ手順で、Cancel をコピーして Positive Button を "q" に変更します。
動作テスト
キーを受ける処理は、第3回で作成した PlayerControl オブジェクト(キャラクターを十字キーで動かすC#スクリプト)に追加したので、ここに以下を追加します。
コード
public class PlayerControl : MonoBehaviour
{
    void Update()
    {
        if (Input.GetKeyDown(KeyCode.E)){    // キー取得
            Debug.Log("E");
        };
        if (Input.GetButtonDown("Submit")){    // キーの意味を取得
            Debug.Log("Submit");
        };
        if (Input.GetKeyDown(KeyCode.Q)){    // キー取得
            Debug.Log("Q");
        };
        if (Input.GetButtonDown("Cancel")){    // キーの意味を取得
            Debug.Log("Cancel");
        };
    }
}
新しいキー管理 (Input System)
新しいキー管理の方法 Input System は、プロジェクトで複数のキーマップを保持できます。押されたキー自体の監視(例えば "E" キー自体を監視)には初期設定は不要ですが、キーを意味的に取得する場合(例えば "E" キーやその他のキーをまとめてSubmitとして監視)には一連の初期設定が必要です(本節以降にまとめます)。
第11回 に書いたとおり、複数のゲーム環境に対応するためには、キーを意味的に取得する方法が推奨されています。
Input System を使用するには、以下を行います。
1) Input System Asset のインストール
2) Input Manager から Input System への切り替え
3) Input System の構成要素の作成
a) Input Settings の追加
b) Input Actions の追加
c) Player Input(Input Actions を使用するためのコンポーネント)のゲームオブジェクトへの追加
多いですね…
Input System Asset のインストール
(1) Unity画面メニューから、Window > Package Manager を選択
(Package Manager画面が開きます)
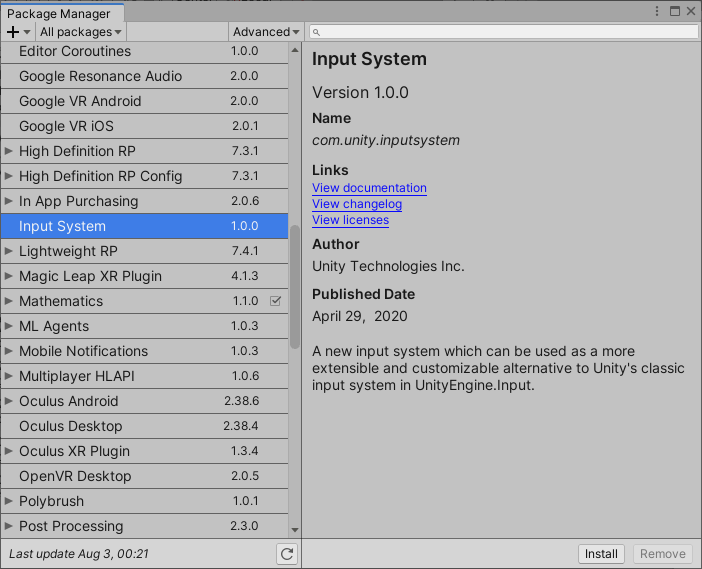
(2) Package Manager のパッケージ一覧から、Input System を選択
(3) 画面右下の Install をクリック
※パッケージ一覧が表示されるまでに時間がかかることがあります。
※パッケージ一覧は アルファベット昇順(ABC...) に並んでいることに気が付くと探しやすくなるのですが、それでも量があるので検索窓を使った方が楽です。
(追記23/7/24 By unity2020.3.26f1)
以下はWebGL設定の場合に出るのかもしれない。とりあえず備忘として:
インストール後、以下の警告が出てきたので、YES。
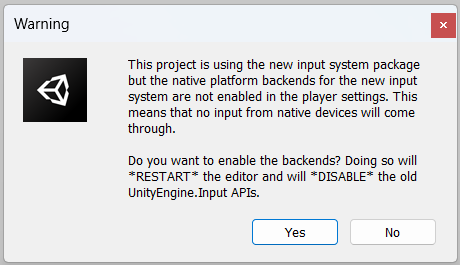
ネイティブとPlayer Inputが繋がってないので、キーメッセージを受け取れないよ、という意味。
インポート後、さらに以下の警告が出るので、SAVE。
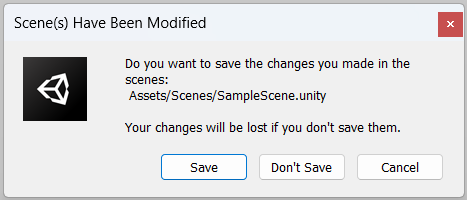
保存しないとインポートが無意味になるよ、という意味。
SAVEを押した後、エディタが再起動する。
Input Manager から Input System に切り替える
Input Manager から Input System に切り替えるには、プロジェクトの設定画面で変更します。
(1) Unity画面から、Edit > Project Settings... を選択
(Project Settings メニューが開きます)
(2) 左のメニューから、Player を選択
(3) 右のメニューから、パソコンマークのアイコンを選択
(4) Other Settingsを選択して展開します
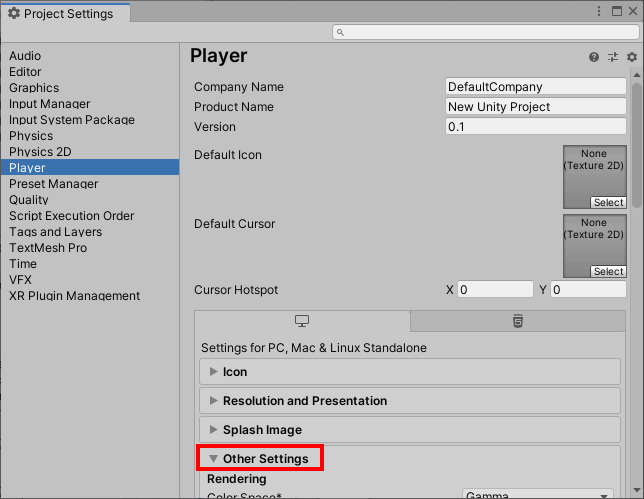
(5) メニューを下にスクロールしていき、Configuration 欄の Active Input Handlingを見つけます
(6) Active Input Handlingの入力欄をクリックします。
(7) Input System Package (New) を選択します。
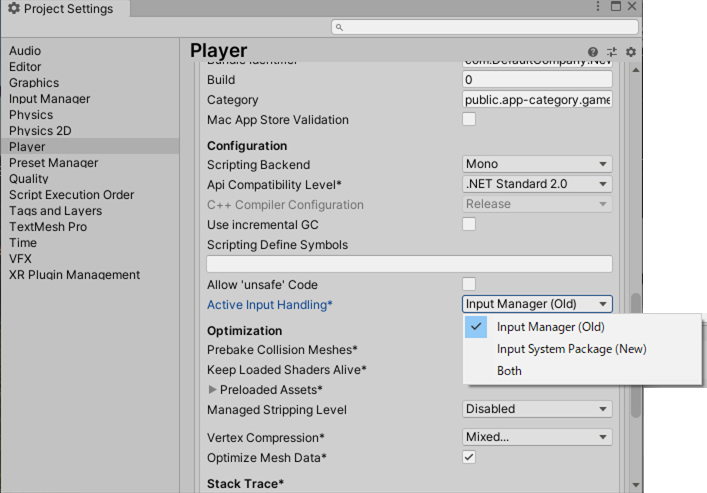
(8) 再起動をうながす警告が表示されますので、yes をクリックします。
(Unityが再起動します。再起動後は、再起動前と同じ Project Settingsの画面が表示されます。再起動後は、Input Manager の下に Input System Package が追加されます。)
※Input Manager 側は無効になった警告が出るようになります。
※Input System Package はこの時点では何も変更しません。
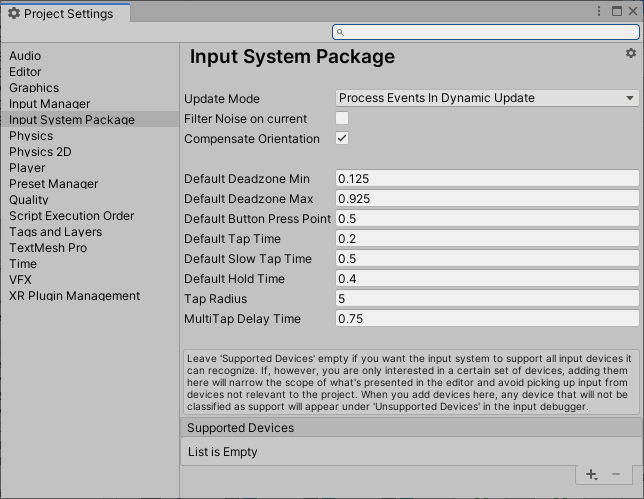
InputSettings(.inputsettings) を作成する
(1) Unity画面から、Edit > Project Settings... を選択
(Project Settings メニューが開きます)
(2) 左のメニューから、Input System Package を選択
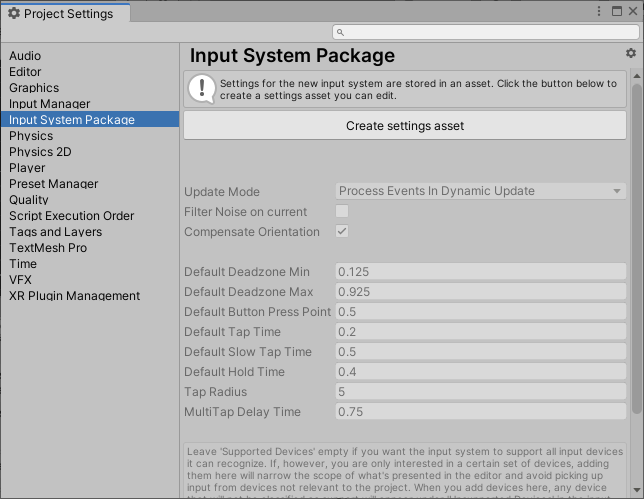
(3) 右のメニューから、Create settings asset をクリック
( Assets 下に、.inputsettings オブジェクトが生成され、Input System Package の非アクティブ部分がアクティブになります。)

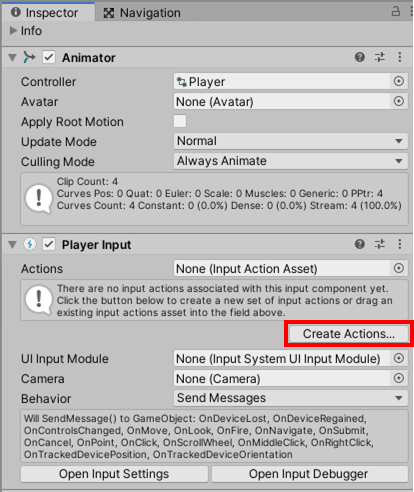
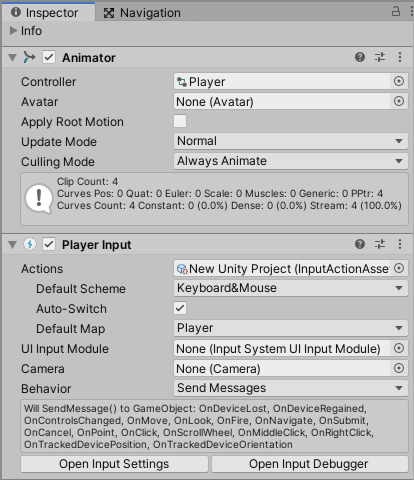
Player Input コンポーネントを追加する
(1) 入力を受け付けたいコンポーネントで、
Add Component > Input > Player Input を選択
(Player Inputコンポーネントが追加されます)
InputActions(.inputactions) を作成する
先ほど追加したPlayer Inputコンポーネントで、
(1) Create Actions… をクリックする
(2) 名前を付けて保存します(拡張子.inputactions)
デフォルトでは 「(自分のプロジェクト名).inputactions」となっています。
(今回はデフォルトのままにしました)
以下は、生成された Input Actions のアイコンです。先ほど作成した Input Settings はあまり触ることはありませんが、こちらはキーを追加する時に触りますので、アイコンの違いで見分けます。

※Input Actions は複数の作り方があるようですが、Player Input > Create Actions... で作成した時は、最初から Player と UI の2つの Action Map が作成された状態の Input Actions が作成されるため、キー配置作業を大幅に短縮できます。
以下の図は、Input Actionsアイコンをダブルクリックしたときに開かれるキーを追加削除するウィンドウです(キーの追加は後述します)
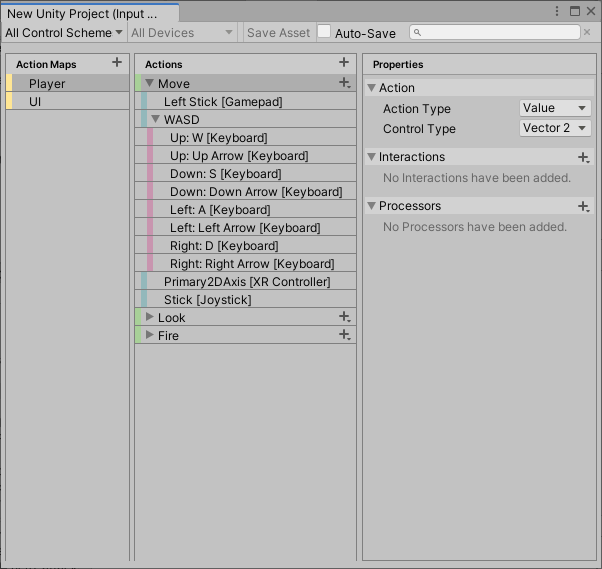
※ゲームオブジェクトのコンポーネントにあるボタンから生成しているので、オブジェクト毎に作るような気がしてしまいますが、Input Actions は1プロジェクトに1つあれば事足りると思われます。
(以下の方法でも作成できますが、空の Input Actions が作られるため、キーを1から設定しなければならないので少し面倒です)
(1) Unity画面メニューから、Assets > Create > Input Actions を選択
(2) 確定する前に名前を付けてから保存します。
InputActions(.inputactions) を Player Input コンポーネントにアタッチする
入力を受け付けたいコンポーネントの Player Input コンポーネントで、
(1) Actions 欄に、先ほど作成した InputActions(.inputactions) をドラッグ&ドロップ
(2) Actionsに欄が追加されるので、以下を設定する
Default Scheme: KeyboardMouseDefault Map: Player or UI (ここではPlayer)
InputActions(.inputactions) を C#スクリプト(.cs) に出力する
(1) Projectウィンドウから、Input Actions を選択
(2) Inspectorウィンドウから、Generate C# Class にチェック
(以下の入力欄が表示されます)
デフォルトではプロジェクト名で生成します。
(今回はデフォルト名にしました)
(2) Apply をクリックします。
(C#スクリプトが作成されます)
※このスクリプトは生成するだけで、アタッチする必要はありません。ただ、キーを追加するたびにこの作業が必要になります(以前に作成した.csを上書きします。後述。)
Input Manager からの移植(C#スクリプトの修正)
Input Manager と Input System ではキーの受け取り方が異なるため、キーイベントを使用するC#スクリプトを修正(Input System方式に移植)する必要があります。
キー入力のテスト
第3回で実装したキー入力部を移植します。Input Manager との違いは、Input Systemでは Update() でのキー取得の他に、キーが押された瞬間の処理でキーを取得できることです。ここでは十字キーが押された時に発生する OnMove() イベントでキーを取得します。
コード
using System.Collections;
using System.Collections.Generic;
using UnityEngine;
using UnityEngine.InputSystem;    // ← 追加

public class PlayerControl2 : MonoBehaviour
{
    // キー入力
    private Vector2 input;

    // Start is called before the first frame update
    void Start()
    {
    }

    // Update is called once per frame
    void Update()
    {
    }

    // 新Input System (入力イベントで取得)
    void OnMove(InputValue value)
    {
        input = value.Get<Vector2>();
        Debug.Log(input);
    }
}
押された時と離された時のイベントをそれぞれ取得していることが分かります。
十字キーでキャラクターが動くテスト
第5回で実装した動作部を移植します。動作は以前のスクリプトと同じく OnFixedUpdate() に実装します。
コード
using System.Collections;
using System.Collections.Generic;
using UnityEngine;
using UnityEngine.InputSystem;

public class PlayerControl2 : MonoBehaviour
{
    // キー入力
    private Vector2 input;

    // 移動
    private float speed;
    private Rigidbody2D rigidBody;

    // Start is called before the first frame update
    void Start()
    {
        speed = 0.1f;
        rigidBody = GetComponent<Rigidbody2D>();
    }

    // Update is called once per frame
    void Update()
    {
    }

    // 新Input System (入力イベントで取得)
    void OnMove(InputValue value)
    {
        input = value.Get<Vector2>();
    }

    void FixedUpdate() {
        // 移動
        if (input == Vector2.zero){
            return;
        }
        rigidBody.position += input * speed;
}
最後に取得したイベントがキーを離すイベントだった場合、入力が失われるため、少し動きが鈍くなった印象ですが、押した分しか移動しないので、キーを離した時のキャラクターが滑るような感触が無くなって操作しやすくなった気がします。(今後の改善が必要か)
アニメーション切り替えのテスト
第6回で実装したアニメーションの切り替え処理を移植します。
コード
using System.Collections;
using System.Collections.Generic;
using UnityEngine;
using UnityEngine.InputSystem;

public class PlayerControl2 : MonoBehaviour
{
    // キー入力
    private Vector2 input;

    // 移動
    private float speed;
    private Rigidbody2D rigidBody;

    // アニメーション
    private Vector2 scale;
    private Animator animator;

    // Start is called before the first frame update
    void Start()
    {
        speed = 0.1f;
        rigidBody = GetComponent<Rigidbody2D>();
        animator = GetComponent<Animator>();
    }

    // Update is called once per frame
    void Update()
    {
    }

    // 新Input System (入力イベントで取得)
    void OnMove(InputValue value)
    {
        input = value.Get<Vector2>();
    }

    void FixedUpdate() {
        // 移動
        if (input == Vector2.zero){
            return;
        }
        rigidBody.position += input * speed;

        // キャラクターの左右反転
        scale = this.transform.localScale;
        if( input.x > 0 ){
            scale.x = 1;
        } else if( input.x < 0 ){
            scale.x = -1;
        }
        this.transform.localScale = scale;

        // アニメーション方向決定
        animator.SetFloat("dirX", input.x);
        animator.SetFloat("dirY", input.y);
    }
}
移植時に発生したエラー
移植してテストすると、以下のエラーが発生します。主に Input Manager と Input System のイベント処理の違いによって発生していると思われます。対処方法も含めて、以下にまとめます。
InvalidOperationException(新旧方式の衝突)
EventSystem オブジェクトの Standalone Input Module が Input Manager 専用らしく、Input System にすると衝突してしまうようです。これは、Standalone Input Module を Input System 用のコンポーネントInput System UI Module に変更することで解決します。
(1) Hierarchyウィンドウから、EventSystem を選択します。
(2) Inspectorウィンドウから、Standalone Input Module を見つけます。
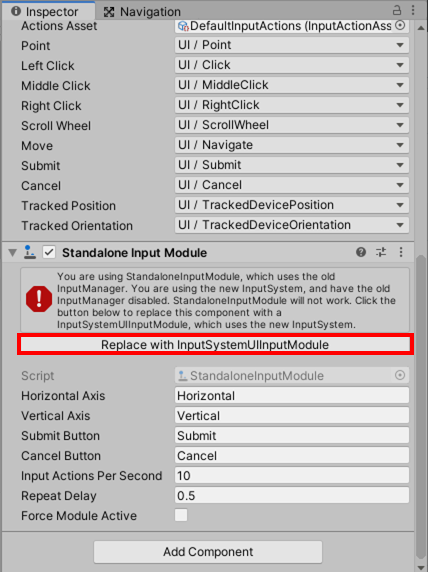
(3) Replace with InputSystemUIInputModule をクリックします。
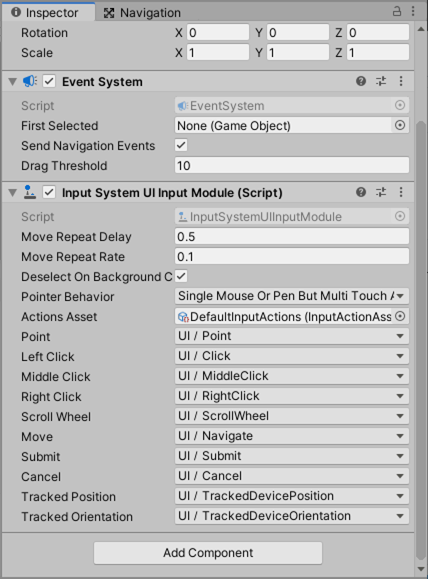
(Standalone Input Module が Input System UI Input Module に置換されます)
また、Input Manager 方式のコードが存在すると、エラーが出ますので、Input Manager 方式のコードを無効化します。
たとえば、キャラクターにPlayerControl という C#スクリプトを割り付けていたとすると、
(1) Hierarchyウィンドウから、該当のオブジェクトを選択
(2) Inspectorウィンドウから、アタッチしたC#スクリプトを見つけます
(3) C#スクリプト名の左にあるチェックを外します
Input System でのキーの追加
キーの追加
Input Actions を開く
(1) Projectウィンドウで Assetsフォルダを選択
(2) Input Actions(.inputactions) ファイルをダブルクリック
Input Actions の編集
UI側の Submit, Cancel はアサインされていないので、ここに "Q" と "E" を割り当てる
何も割り当てが無いと イベント名[Any] と表示されている

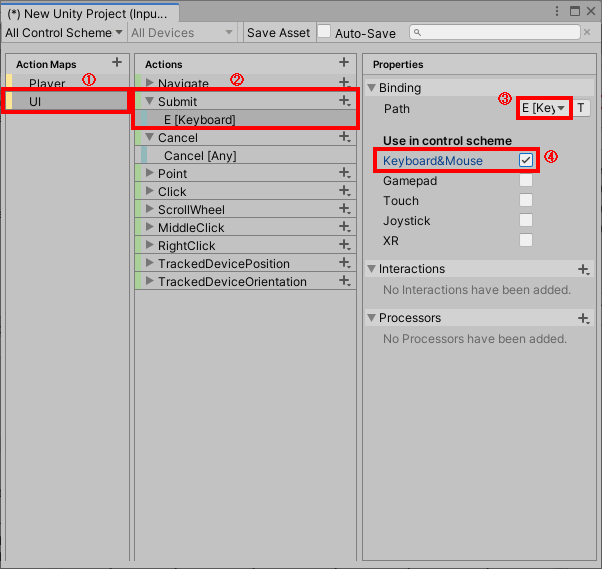
Eの割り付け
(1) Action Maps : UI
(2) Actions : Submit
(3) Properties > Binding を選択
(4) Path の Sumbit▼ を選択
(5) 検索窓で E を押す > E [KeyBoard] を選択
(Listen をクリック > E を押す > E [KeyBoard] を選択 でも良い)
(6) Use in control scheme で Keyboard&Mouse にチェック
同じように "Q" を Cancel に登録します。
Input Actions の保存
Input Actions の保存は、Input Actions 画面内で Save Asset を押します。.inputactionsはファイルとして独立しているためか。
動作テスト
Player Inputを付けたゲームオブジェクトに、以下のC#スクリプトをアタッチします。
コード
using System.Collections;
using System.Collections.Generic;
using UnityEngine;
using UnityEngine.InputSystem;

public class PlayerControlTest : MonoBehaviour
{
    public void OnNavigate(InputValue value)
    {
        input = value.Get<Vector2>();
        Debug.Log("Player: " + input);
    }

    public void OnSubmit()
    {
        Debug.Log("Submit");
    }

    public void OnCancel()
    {
        Debug.Log("Cancel");
    }
}
今回の作業に当たって、以下のサイトを参考にしました。
tsubakit1.hateblo.jp
gametukurikata.com